1.0 Sarah's Stamping Style

Friday, December 2, 2011

Caged Birds


Today's card was inspired by a beautiful creation made by Jami Sibley. I can't find the exact card on her blog as I had just saved it to my hard drive, but it must be there! Anyway, go over and check out all of her beautiful work.

I changed the card up a little, using a different stamp set, ribbon, flowers and embellishments. I used two of my faves on this card, Aviary stamp set and Melon Mambo! I would have liked the black birdcages to be darker and more definite. Maybe I should have used black embossing powder!


I teamed the Melon Mambo with some Crumbcake and Black CS and added some beautiful Polka Dot Melon Mambo ribbon.

I punched the sentiment out using the Decorative Label Punch.

I made this for a dear friend's birthday! I haven't seen her yet to give it to her, so it will be belated. Hopefully she doesn't read this blog first and guess it is her!


Any Questions? Just ask!
Thanks for stopping by today.

Thursday, December 1, 2011

Special Get Well Wishes


Today I have a card that I made a few weeks ago for a special little girl at the school where I work. She got quite ill and was in hospital for a week or so, so the staff decided to send some get well wishes to her and her family.

I thought that the image from the Forever Young set would be perfect for this card. It was exactly what we were wishing for the family, their little girl to be up and playing and healthy again.


I stamped the image directly onto some DSP, which I had never done before. This is from the Timeless Portrait DSP. I used some black embossing powder on the image to make a darker print with a more striking contrast.

I paired the DSP with some Whipser White and Island Indigo CS.


I finished the card off with some Island Indigo Ruffle Ribbon (Yum! Love it!), and some white and teal coloured flowers. I then used the Jewellery Tag Punch to add some Get Well Wishes.


You will all be glad to know that the little girl is now back at school and all seems to be well! Great news!


Any questions? Just ask!
Thanks for stopping by today.

Tuesday, November 29, 2011

Rudolph the Red Nosed Stocking


Hi there!
Today I have another stocking card that isn't a stocking. Today the stocking is...... Rudolph!
His head and ears are made using the Stocking Punch and his antlers are the 2 Step Bird Punch. I have used one of the gorgeous new Glimmer Brads for his nose, and some red and white Baker's twine for his reins. I have finished him off with a googly eye.


The card base is Certainly Celery layered with the Gorgeous Cherry Cobbler 1 1/4" Striped Grosgrain Ribbon.  Topped with a Designer Button threaded with some linen thread.

The layout was inspired by a card by Debby Hughes, but I changed it up a little and added my little Rudolph.


A quick and easy card, but very cute I think!


Any questions? Just ask!
Thanks for stopping by!


Monday, November 28, 2011

Sparkly Snowflakes


Two posts in two days. Who would ever have known! Not like me lately....but now I have a bit of a back log to share, so must get to it and get organised.

Today I have a very sparkly snowflake card to share. It is a lot more sparkly IRL, but photos never do bling and sparkle the justice they deserve!


This card was inspired by the talented


I used my two way glue pen and some Dazzling Diamonds to add some sparkle to my snowflakes.


Sunday, November 27, 2011

Snowman Cheer


Hi there. Today I have a card featuring a gorgeous little snowman.
This snowman has been cased from the very talented Heidi over at Stuck on Stampin'.  If you contact her she will very generously email you the instructions to make this little snowman. He was made using all SU! punches.


I have used some of the gorgeous Flirtatious DSP, in Wisteria Wonder featuring white doilies. I thought this paper went well with the snowman as they could also pass for snowflakes. I teamed the DSP up with some Elegant Eggplant CS and ink.


I ran my two way glue pen around the edge of my sentiment oval and dipped it into Dazzling Diamonds, to give a shimmering snow effect.


I added some purple rhinestones underneath the sentiment and some Basic Pearls to look like snowballs. I also decorated the inside of this one with matching DSP and a Christmas sentiment.

 
Materials:
(All SU unless otherwise stated)
Stamp sets: Christmas sentiments (own stash)
Cardstock/ DSP:  Elegant Eggplant,Whisper White, Basic Black, Flirtatious DSP
Inks: Elegant Eggplant
Markers:
Accessories: Basic Pearls, Rhinestones (own stash), Dazzling Diamonds, Various SU! Punches

Any questions? Just ask! :)
Thanks for stopping by today.

Saturday, November 19, 2011

Banner of Bling!


Hi there!

Hope everyone out there is well and is surviving the crazy weather if you are here in Sydney! 40 degrees one day, 21 degrees the next!

A few weeks ago I was lucky enough to attend a class held by my up line and very talented friend Di Barnes. In this class we completed a beautiful Christmas banner. We made our banners in the traditional red and green Christmas colours.

I change my colour scheme for my tree/ Christmas decorations each year and I don't usually go for the traditional. So I decided to make another banner in the colours I am using this year, purple, turquoise and silver.

I have used Tempting Turquoise, Elegant Eggplant, Wisteria Wonder and Silver. The banner is made using the Petal Cone Die and The Big Shot.


It isn't the easiest thing to photograph as it is so long. Also as I took the photos at night the flash has reflected off all the sparkle and bling! I will try again in the morning and see if I can get any better shots.
I made a few changes, from the banner we made in class. I added a flag in between the words 'Merry' and 'Christmas' and used some of the gorgeous ruffled ribbon to add a bow to each end.


I used the new Silver Glimmer Paper, to add some sparkle to my stocking.


I used lots of bling and sparkle on this one. Can never have too much, especially at Christmas!


Here is a piccy of my tree.


Not a great photo, sorry! But you get the idea!


Materials:
(All SU unless otherwise stated)
Stamp sets: Stitched Stockings
Cardstock/ DSP:  Tempting Turquoise, Elegant Eggplant, Wisteria Wonder, Silver Glimmer Paper, Bright stack DSP
Inks: Elegant Eggplant
Markers:
Accessories: Stocking punch, Petal Cone Die, Large Scallop Circle Punch, Circle Punch, Basic Rhinestones, Linen Thread, Wisteria Wonder Ruffle Ribbon

Any questions? Just ask! :)


Tuesday, November 8, 2011

Little Boy Blue

Hi there!

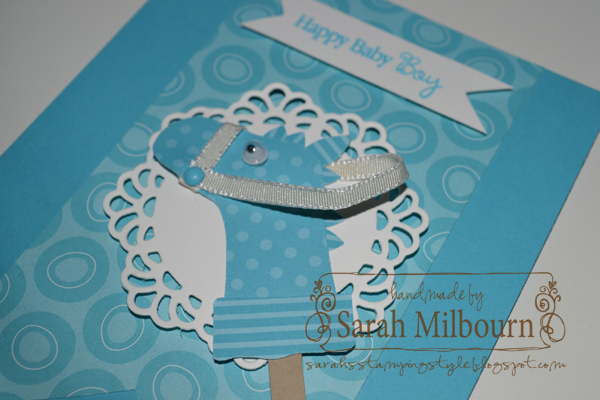
Today I am back with another Hobby Horse. A blue one this time.


I have used some retired DSP for the background and some of the bright DSP stack for the horse.


It was much easier to use a strip of Crumbcake CS for the pole than the wooden skewers I have been using.
I did the mane differently this time as well. Instead of using twine, I cut a series of the 'ears' and adhered these further down than the ear. It was quicker, but I think I like the look of the twine much better.


I was pleasantly surprised when I logged on earlier this afternoon to see that I had been named a Perfect Princess over at Freshly Made Sketches. Thanks for the lovely comments Lesley! I feel very honoured.
 
 
Materials:
(All SU unless otherwise stated)
Stamp sets:
Cardstock/ DSP:  Whisper White, Crumb Cake,Tempting Turquoise, retired DSP, Bright stack DSP
Inks: Tempting Turquoise
Markers:
Accessories: Googly eye, Stocking punch, White Taffeta Ribbon, blue brad
 
Any questions? Just ask! :)